This is a page full of tips and tricks to keep your Teye-Master-guitar or bass in picco bello condition.
Also explained here is the switching.
1. Neck Profiles:
1.
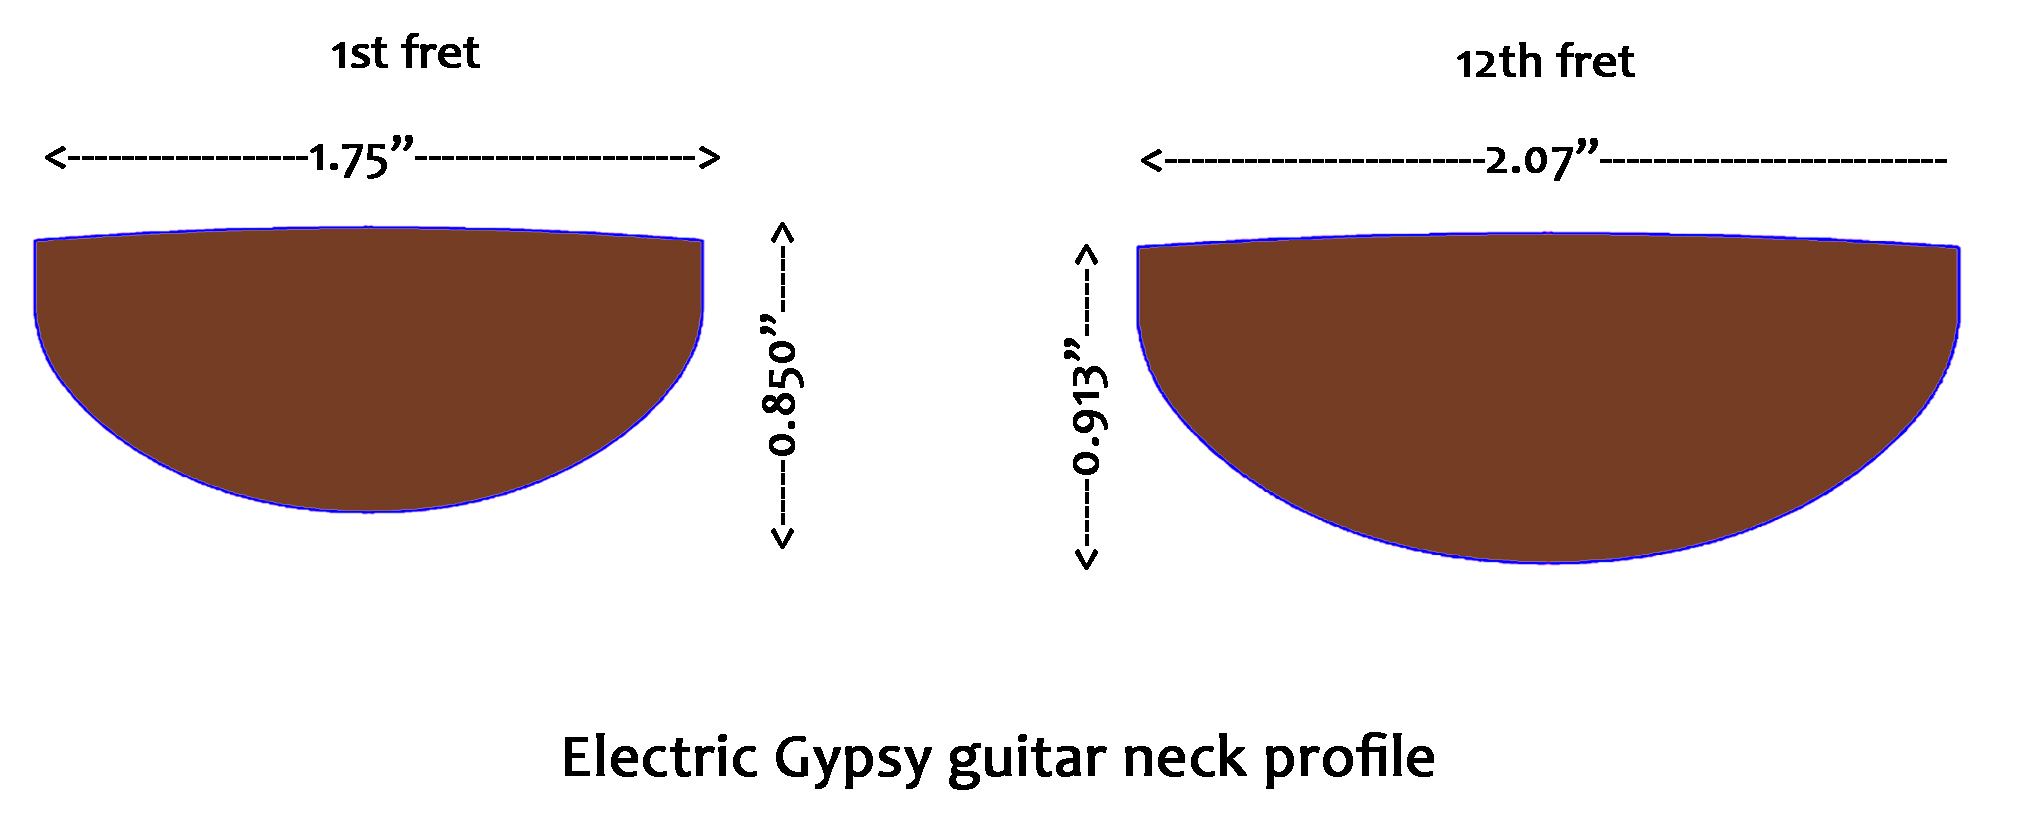
2.

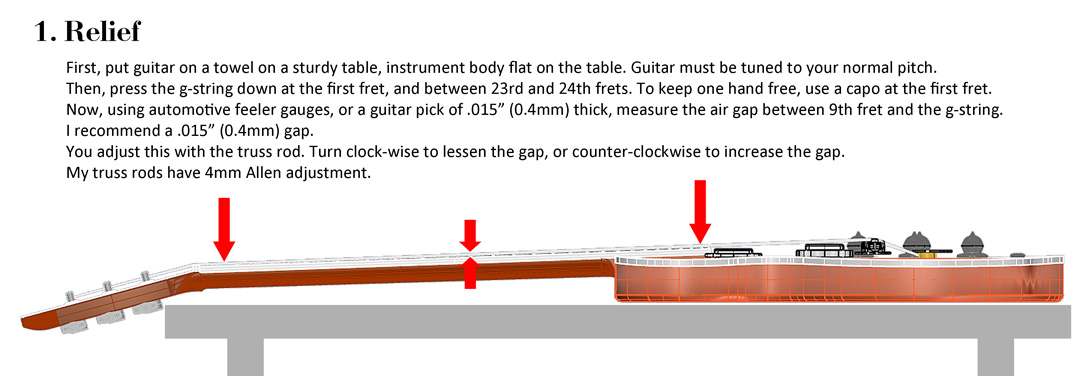
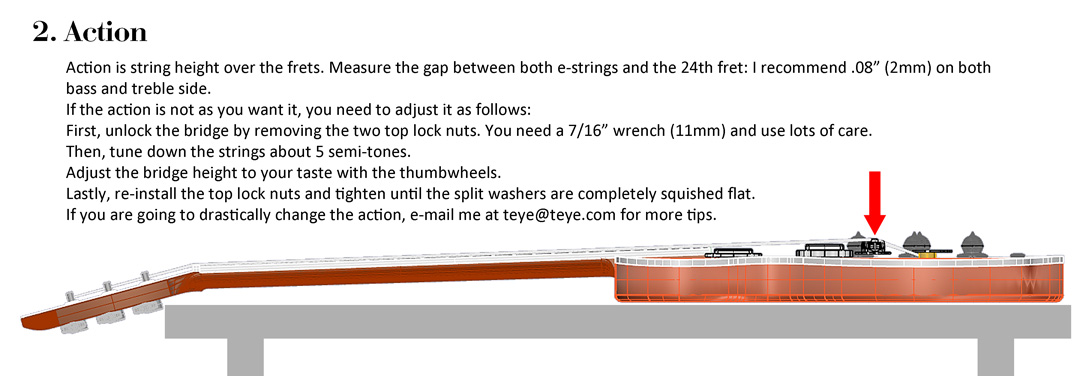
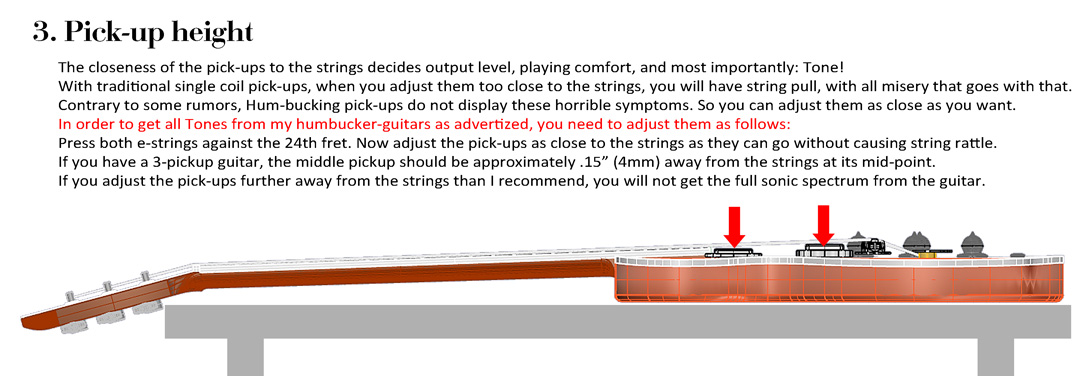
2. Set-up:
3. Cleaning
The wood and finish: use a micro-fiber cleaning cloth, this is sufficient. No need for waxes except maybe once a year. When using wax, make sure there is no silicone in the wax. Prevent the wax from seeping into the wood via screws.
The aluminum plates: I now use coated plates, and a gentle wipe with micro-fiber cloth is sufficient. If you have an A-Series guitar with un-coated plates, you need to clean it with microfiber cloth after every play. If you decide to deep-clean an un-coated plate with metal cleaner, you must be careful to not get the metal cleaner into the engraving grooves as it may dislodge the engravings blacking. How do you know if your plates are coated? Push a finger on the plate: if it leaves a fingerprint, it is an un-coated plate.
Anodized plates (black, gold, or copper) do not need any special care, just a wipe-down with micro-fiber cloth.
The fingerboard: with every string change, wipe some olive oil onto the entire fingerboard and let it sit for 5 minutes minimum. Wipe it off before installing new strings. This will not just clean, it will also nourish the wood, and when you ever need a fret job, the wood will splinter less from fret removal.
I recently received a question from an experienced chef who mentioned that on wooden cutting boards he never used olive oil so as to not get mould on them, and if Lemon oil or Mineral oil would not be a better recommendation. My answer to his question is here:
Lemon oil smells good, it is on and it is gone. May as well not use anything. The olive oil is to prevent the wood from going brittle with the abuse of sweat and skin oil (and perhaps worse). I have used it on every single guitar at every single string change for the past 47 years. This tip cpmes from luthiers like Tony Zemaitis and Manuel Reyes (who in their lifetime have done this on countless guitars.) I have neither seen nor heard of mold on guitars treated with oil. The only mold I’ve seen on guitars was on guitars that were kept in the wrong environment (for example a band that would put their guitars in the hold of their bus right after the show without even wiping them and then seeing them again at the next show – I can assure you those guitars never saw either cleaner, wax or olive oil!) Then again I’ve never used sharp objects like knives on a fingerboard so maybe that’s why no mould? I keep recommending olive oil based on experience, and on the experience of people I highly respect.
4. Teye volume knob black rubber O-rings
These are simple #11 plumbing O-rings: you can find these at any hardware store, or on-line. When they become rotted, simply replace them with fresh ones. In metric, the size definition is: 14 mm x 2,5 mm (19 mm OD)
5. String rattle or buzz
First, please install a fresh set of strings! See if the rattle goes away.
Second, find out if the rattle or buzz comes from a loose screw or nut. Believe me, I’ve seen this.
Then, find out if the problem is fixed after a proper set-up (see above)
. . .
Now, if the rattle is still there, zoom in: find out where the problem is. Does the rattle go away when you fret the offending string at the 1st fret? Then it is a nut problem and you need to take the guitar to a qualified repairman. If not, see if the rattle goes away when you fret at different positions. If the rattle is still there, it may be a bridge saddle rattle.
Bridge saddle rattle. If there is even the slightest rocking motion in a saddle when you move it sideways, you must remove the bridge and force the saddle back onto the bridge floor. To remove the bridge you need a 7/16″ (11mm) wrench and LOTS of care.
You place the bridge flat on an absolutely sturdy surface, like on a wooden table right above a table leg. Protect the table, using a piece of hard-wood. Use another piece of hard-wood of about 1/4″ wide (6.5 mm) and place it on the offending saddle, so that the piece of wood will push down that saddle only. Now hit the piece of wood fairly hard with a hammer a few times, forcing the saddle back onto the bridge floor. If all side-to-side rocking motion has been removed, re-install the bridge.
(Of course, you can have me do all this for you)
The Teye-bridge is a precision part made of materials that are chosen for Tone. Like a finely tuned sports car, some touch-up maintenance will be required from time to time. Nothing to panic about, but it must be done in order to get full enjoyment from the instrument. Having said this, I’ve played Teye-guitars for many years without even touching them in maintenance, except the odd truss rod adjustment because I travel so much.
6. The Teye-way of switching his humbucking pick-ups:
2-Humbucker guitars:
- Switch position 5 (up) – Neck pick-up
- 4 – Neck and Bridge pickup out-of-phase (the ‘Peter Green’ sound)
- 3 (middle) – Neck and Bridge pickups normal
- 2 – Bridge pickup plus tapped Neck pickup
- 1 (down) – Bridge pickup
3-Humbucker guitars:
- Switch position 5 (up) – Neck pick-up
- 4 – Neck and Bridge pickup out-of-phase (the ‘Peter Green’ sound)
- 3 (middle) – Neck and Bridge pickups normal
- 2 – Bridge plus Middle pickup
* - 1 (down) – Bridge pickup
+++Plus+++ - position 2 with Bridge volume rolled to zero – Middle pickup alone
- In between positions 2 and 3 – All three pickups+++Plus+++
*I’ve recently designed a new way of treating the 2nd position on the 3-pickup guitars: a sound with plenty of warmth but with unparalleled bite. If you like to solo on your bridge pickup (who doesn’t?) you will love this sound. It is best secribed as ‘Bridge pickup ‘plus’.
A customer from Australia exclaimed:”Wow! I did not know this sound even existed!” The sound can best be described as a ‘Mick Taylor late sixties-sound. As heard gloriously on the Stones ‘Get yer ya-yas out’ album and ‘Gimme Shelter’ movie.
Available only on 3-pickup guitars and only on my Master-built guitars.
7. Switch tip tips:
The Teye proprietary switch tip and the switch it goes onto:
1) 2010-2017: I started off using a traditional stamped-lever Fender-type ‘cheesecutter’ 5-way switch, and my proprietary tips (both the shiny smooth silver-colored one and the grey-anodized more ribbed Master-guitars-tip) ALMOST fit perfectly. If they are a little on the wide side, the best way to secure them in place is with super-glue. When you have to remove them, best way is to use needle-nose pliers between the guitar and the tip. Make sure you have something to protect the guitar (a few well-placed business cards on top of each other usually do the trick) and simply wedge it off with force. When you need to put it back on, put the guitar face-down and apply super-glue onto the sides of the switch lever, apply superglue-accellerator into the switch tip and simply slide the tip onto the switch. Done.
2) 2018: I began using the super-switch by Schaller with my own PCB on it (with gold-plated contacts that give superior sound) and the lever is much narrower. To remove the tip: see above. To re-install it: you will need some filler material between the tip and the switch. We use a piece of cable insulation (the outer plastic jacket of cable THAT WILL FIT INTO THE TIP HOLE) Glue the cable insulation onto the switch lever (always put the guitar face-down so that any superglue will NOT dribble into the switch slit!) or you can glue the insulation into the swith tip and then glue the switch tip onto the lever, OR glue the insulation onto the lever and THEN glue the insulation into the tip) and Best solution still is to put the insulation into the tip, put superglue into the tip hole, glue combo tip/insulation/glue onto the lever, when done pull the tip off (if still possible) and then glue back together.